The latest release of @cloudflare/agents ↗ brings resumable streaming, significant MCP client improvements, and critical fixes for schedules and Durable Object lifecycle management.
Resumable streaming
AIChatAgent now supports resumable streaming, allowing clients to reconnect and continue receiving streamed responses without losing data. This is useful for:
Long-running AI responses
Users on unreliable networks
Users switching between devices mid-conversation
Background tasks where users navigate away and return
Real-time collaboration where multiple clients need to stay in sync
Streams are maintained across page refreshes, broken connections, and syncing across open tabs and devices.
The MCPClientManager API has been redesigned for better clarity and control:
New registerServer() method: Register MCP servers without immediately connecting
New connectToServer() method: Establish connections to registered servers
Improved reconnect logic: restoreConnectionsFromStorage() now properly handles failed connections
// Register a server to Agentconst { id } = await this.mcp.registerServer({ name: "my-server", url: "https://my-mcp-server.example.com",});// Connect when readyawait this.mcp.connectToServer(id);// Discover tools, prompts and resourcesawait this.mcp.discoverIfConnected(id);
The SDK now includes a formalized MCPConnectionState enum with states: idle, connecting, authenticating, connected, discovering, and ready.
Enhanced MCP discovery
MCP discovery fetches the available tools, prompts, and resources from an MCP server so your agent knows what capabilities are available. The MCPClientConnection class now includes a dedicated discover() method with improved reliability:
Supports cancellation via AbortController
Configurable timeout (default 15s)
Discovery failures now throw errors immediately instead of silently continuing
Bug fixes
Fixed a bug where schedules ↗ meant to fire immediately with this.schedule(0, ...) or this.schedule(new Date(), ...) would not fire
Fixed an issue where schedules that took longer than 30 seconds would occasionally time out
Fixed SSE transport now properly forwards session IDs and request headers
Fixed AI SDK stream events conversion to UIMessageStreamPart
We've partnered with Black Forest Labs (BFL) to bring their latest FLUX.2 [dev] model to Workers AI! This model excels in generating high-fidelity images with physical world grounding, multi-language support, and digital asset creation. You can also create specific super images with granular controls like JSON prompting.
Pricing documentation is available on the model page or pricing page. Note, we expect to drop pricing in the next few days after iterating on the model performance.
Workers AI Platform specifics
The model hosted on Workers AI is able to support up to 4 image inputs (512x512 per input image). Note, this image model is one of the most powerful in the catalog and is expected to be slower than the other image models we currently support. One catch to look out for is that this model takes multipart form data inputs, even if you just have a prompt.
With the REST API, the multipart form data input looks like this:
curl --request POST \
  --url 'https://api.cloudflare.com/client/v4/accounts/{ACCOUNT}/ai/run/@cf/black-forest-labs/flux-2-dev' \
  --header 'Authorization: Bearer {TOKEN}' \
  --header 'Content-Type: multipart/form-data' \
  --form 'prompt=a sunset at the alps' \
  --form steps=25
  --form width=1024
  --form height=1024
With the Workers AI binding, you can use it as such:
const form = new FormData();form.append('prompt', 'a sunset with a dog');form.append('width', '1024');form.append('height', '1024');//this dummy request is temporary hack//we're pushing a change to address this soonconst formRequest = new Request('http://dummy', { method: 'POST', body: form});const formStream = formRequest.body;const formContentType = formRequest.headers.get('content-type') || 'multipart/form-data';const resp = await env.AI.run("@cf/black-forest-labs/flux-2-dev", { multipart: { body: formStream, contentType: formContentType }});
The parameters you can send to the model are detailed here:
JSON Schema for ModelRequired Parameters
prompt (string) - Text description of the image to generate
Optional Parameters
input_image_0 (string) - Binary image
input_image_1 (string) - Binary image
input_image_2 (string) - Binary image
input_image_3 (string) - Binary image
steps (integer) - Number of inference steps. Higher values may improve quality but increase generation time
guidance (float) - Guidance scale for generation. Higher values follow the prompt more closely
width (integer) - Width of the image, default 1024 Range: 256-1920
height (integer) - Height of the image, default 768 Range: 256-1920
seed (integer) - Seed for reproducibility
## Multi-Reference ImagesThe FLUX.2 model is great at generating images based on reference images. You can use this feature to apply the style of one image to another, add a new character to an image, or iterate on past generate images. You would use it with the same multipart form data structure, with the input images in binary.For the prompt, you can reference the images based on the index, like `take the subject of image 1 and style it like image 0` or even use natural language like `place the dog beside the woman`.Note: you have to name the input parameter as `input_image_0`, `input_image_1`, `input_image_2` for it to work correctly. All input images must be smaller than 512x512.```bashcurl --request POST \ --url 'https://api.cloudflare.com/client/v4/accounts/{ACCOUNT}/ai/run/@cf/black-forest-labs/flux-2-dev' \ --header 'Authorization: Bearer {TOKEN}' \ --header 'Content-Type: multipart/form-data' \ --form 'prompt=take the subject of image 1 and style it like image 0' \ --form input_image_0=@/Users/johndoe/Desktop/icedoutkeanu.png \ --form input_image_1=@/Users/johndoe/Desktop/me.png \ --form steps=25 --form width=1024 --form height=1024
Through Workers AI Binding:
//helper function to convert ReadableStream to Blobasync function streamToBlob(stream: ReadableStream, contentType: string): Promise<Blob> { const reader = stream.getReader(); const chunks = []; while (true) { const { done, value } = await reader.read(); if (done) break; chunks.push(value); } return new Blob(chunks, { type: contentType });}const image0 = await fetch("http://image-url");const image1 = await fetch("http://image-url");const form = new FormData();const image_blob0 = await streamToBlob(image0.body, "image/png");const image_blob1 = await streamToBlob(image1.body, "image/png");form.append('input_image_0', image_blob0)form.append('input_image_1', image_blob1)form.append('prompt', 'take the subject of image 1and style it like image 0')//this dummy request is temporary hack//we're pushing a change to address this soonconst formRequest = new Request('http://dummy', { method: 'POST', body: form});const formStream = formRequest.body;const formContentType = formRequest.headers.get('content-type') || 'multipart/form-data';const resp = await env.AI.run("@cf/black-forest-labs/flux-2-dev", { multipart: { body: form, contentType: "multipart/form-data" }})
JSON Prompting
The model supports prompting in JSON to get more granular control over images. You would pass the JSON as the value of the 'prompt' field in the multipart form data. See the JSON schema below on the base parameters you can pass to the model.
AI Search now supports custom HTTP headers for website crawling, solving a common problem where valuable content behind authentication or access controls could not be indexed.
Previously, AI Search could only crawl publicly accessible pages, leaving knowledge bases, documentation, and other protected content out of your search results. With custom headers support, you can now include authentication credentials that allow the crawler to access this protected content.
This is particularly useful for indexing content like:
Internal documentation behind corporate login systems
Premium content that requires users to provide access to unlock
Sites protected by Cloudflare Access using service tokens
To add custom headers when creating an AI Search instance, select Parse options. In the Extra headers section, you can add up to five custom headers per Website data source.
For example, to crawl a site protected by Cloudflare Access, you can add service token credentials as custom headers:
AI Crawl Control now supports per-crawler drilldowns with an extended actions menu and status code analytics. Drill down into Metrics, Cloudflare Radar, and Security Analytics, or export crawler data for use in WAF custom rules, Redirect Rules, and robots.txt files.
What's new
Status code distribution chart
The Metrics tab includes a status code distribution chart showing HTTP response codes (2xx, 3xx, 4xx, 5xx) over time. Filter by individual crawler, category, operator, or time range to analyze how specific crawlers interact with your site.
Extended actions menu
Each crawler row includes a three-dot menu with per-crawler actions:
View Metrics — Filter the AI Crawl Control Metrics page to the selected crawler.
View on Cloudflare Radar — Access verified crawler details on Cloudflare Radar.
Copy User Agent — Copy user agent strings for use in WAF custom rules, Redirect Rules, or robots.txt files.
View in Security Analytics — Filter Security Analytics by detection IDs (Bot Management customers).
Copy Detection ID — Copy detection IDs for use in WAF custom rules (Bot Management customers).
Get started
Log in to the Cloudflare dashboard, and select your account and domain.
Go to AI Crawl Control > Metrics to access the status code distribution chart.
Go to AI Crawl Control > Crawlers and select the three-dot menu for any crawler to access per-crawler actions.
Select multiple crawlers to use bulk copy buttons for user agents or detection IDs.
Workers, including those using Durable Objects and Browser Rendering, may now process WebSocket messages up to 32 MiB in size. Previously, this limit was 1 MiB.
This change allows Workers to handle use cases requiring large message sizes, such as processing Chrome Devtools Protocol messages.
AI Search now supports reranking for improved retrieval quality and allows you to set the system prompt directly in your API requests.
Rerank for more relevant results
You can now enable reranking to reorder retrieved documents based on their semantic relevance to the user’s query. Reranking helps improve accuracy, especially for large or noisy datasets where vector similarity alone may not produce the optimal ordering.
You can enable and configure reranking in the dashboard or directly in your API requests:
const answer = await env.AI.autorag("my-autorag").aiSearch({ query: "How do I train a llama to deliver coffee?", model: "@cf/meta/llama-3.3-70b-instruct-fp8-fast", reranking: { enabled: true, model: "@cf/baai/bge-reranker-base", },});
Set system prompts in API
Previously, system prompts could only be configured in the dashboard. You can now define them directly in your API requests, giving you per-query control over behavior. For example:
// Dynamically set query and system prompt in AI Searchasync function getAnswer(query, tone) { const systemPrompt = `You are a ${tone} assistant.`; const response = await env.AI.autorag("my-autorag").aiSearch({ query: query, system_prompt: systemPrompt, }); return response;}// Example usageconst query = "What is Cloudflare?";const tone = "friendly";const answer = await getAnswer(query, tone);console.log(answer);
AI Crawl Control now includes a Robots.txt tab that provides insights into how AI crawlers interact with your robots.txt files.
What's new
The Robots.txt tab allows you to:
Monitor the health status of robots.txt files across all your hostnames, including HTTP status codes, and identify hostnames that need a robots.txt file.
Track the total number of requests to each robots.txt file, with breakdowns of successful versus unsuccessful requests.
Check whether your robots.txt files contain Content Signals ↗ directives for AI training, search, and AI input.
Identify crawlers that request paths explicitly disallowed by your robots.txt directives, including the crawler name, operator, violated path, specific directive, and violation count.
Filter robots.txt request data by crawler, operator, category, and custom time ranges.
Take action
When you identify non-compliant crawlers, you can:
Deepgram's newest Flux model @cf/deepgram/flux is now available on Workers AI, hosted directly on Cloudflare's infrastructure. We're excited to be a launch partner with Deepgram and offer their new Speech Recognition model built specifically for enabling voice agents. Check out Deepgram's blog ↗ for more details on the release.
The Flux model can be used in conjunction with Deepgram's speech-to-text model @cf/deepgram/nova-3 and text-to-speech model @cf/deepgram/aura-1 to build end-to-end voice agents. Having Deepgram on Workers AI takes advantage of our edge GPU infrastructure, for ultra low latency voice AI applications.
Promotional Pricing
For the month of October 2025, Deepgram's Flux model will be free to use on Workers AI. Official pricing will be announced soon and charged after the promotional pricing period ends on October 31, 2025. Check out the model page for pricing details in the future.
Example Usage
The new Flux model is WebSocket only as it requires live bi-directional streaming in order to recognize speech activity.
Create a worker that establishes a websocket connection with @cf/deepgram/flux
Write a client script to connect to your worker and start sending random audio bytes to it
const ws = new WebSocket('wss://<your-worker-url.com>');ws.onopen = () => { console.log('Connected to WebSocket'); // Generate and send random audio bytes // You can replace this part with a function // that reads from your mic or other audio source const audioData = generateRandomAudio(); ws.send(audioData); console.log('Audio data sent');};ws.onmessage = (event) => { // Transcription will be received here // Add your custom logic to parse the data console.log('Received:', event.data);};ws.onerror = (error) => { console.error('WebSocket error:', error);};ws.onclose = () => { console.log('WebSocket closed');};// Generate random audio data (1 second of noise at 44.1kHz, mono)function generateRandomAudio() { const sampleRate = 44100; const duration = 1; const numSamples = sampleRate * duration; const buffer = new ArrayBuffer(numSamples * 2); const view = new Int16Array(buffer); for (let i = 0; i < numSamples; i++) { view[i] = Math.floor(Math.random() * 65536 - 32768); } return buffer;}
We’re shipping three updates to Browser Rendering:
Playwright support is now Generally Available and synced with Playwright v1.55 ↗, giving you a stable foundation for critical automation and AI-agent workflows.
We’re also adding Stagehand support (Beta) so you can combine code with natural language instructions to build more resilient automations.
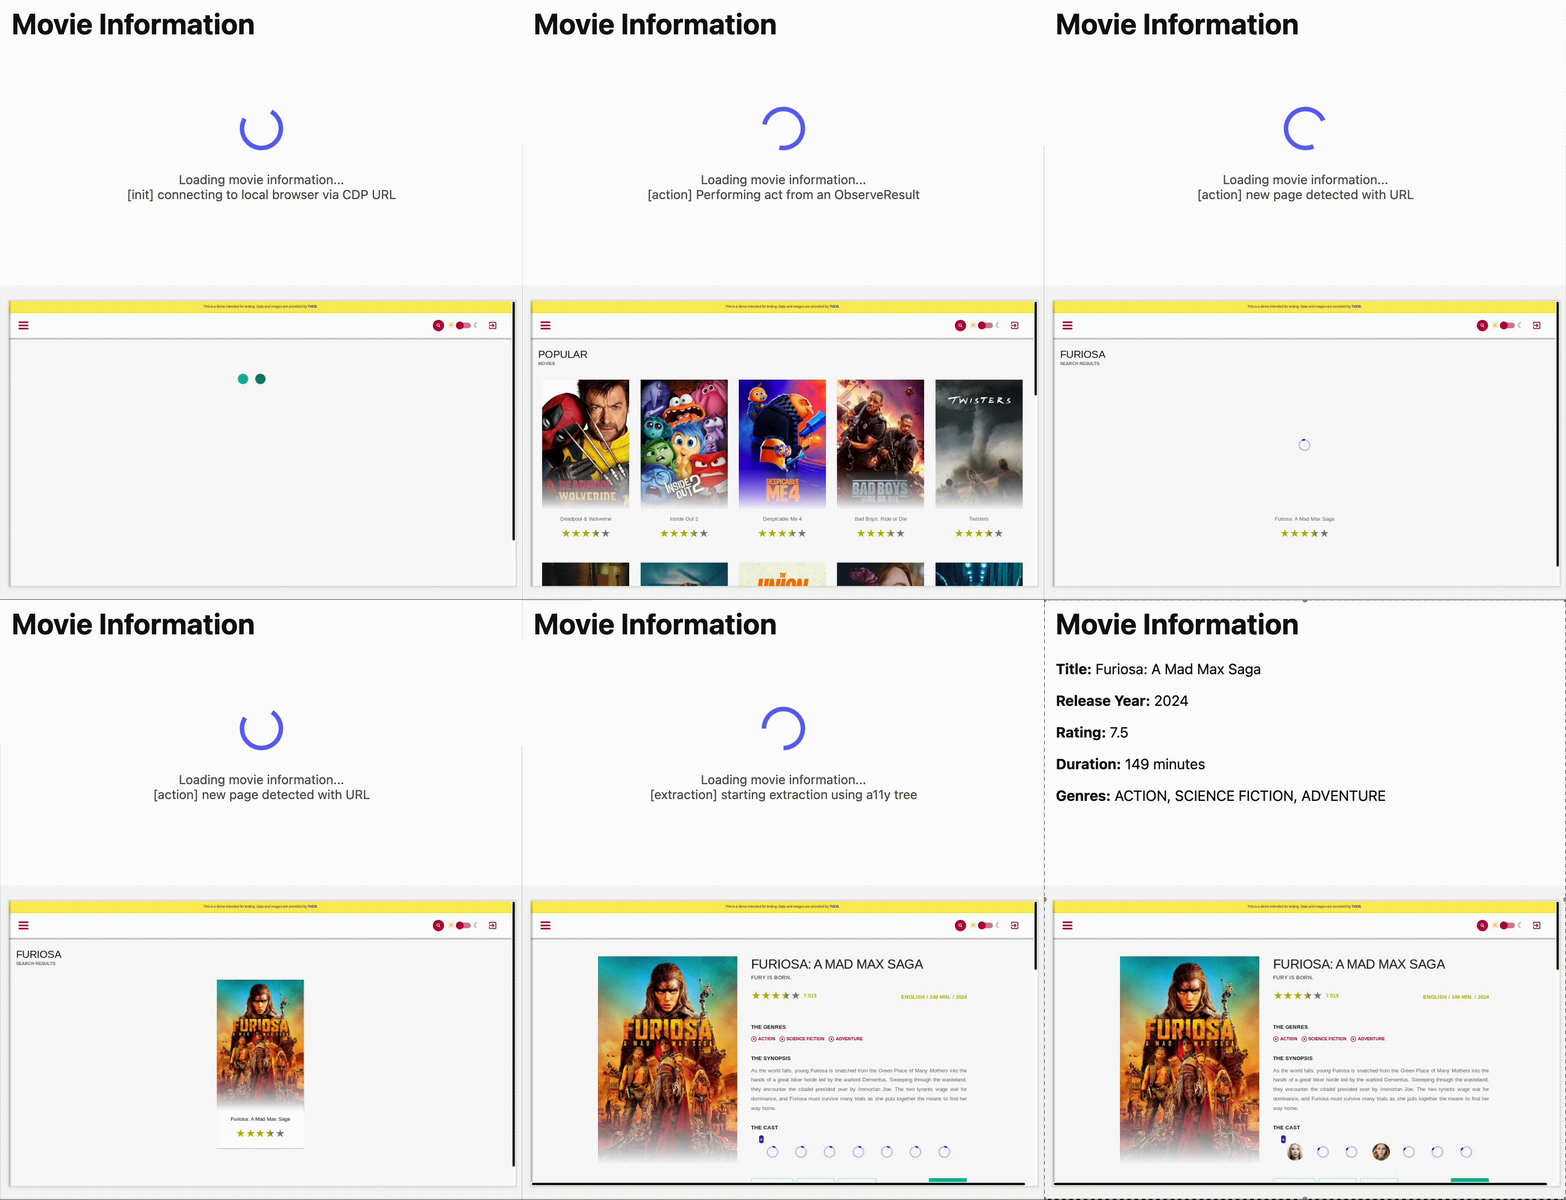
To get started with Stagehand, refer to the Stagehand example that uses Stagehand and Workers AI to search for a movie on this example movie directory ↗, extract its details using natural language (title, year, rating, duration, and genre), and return the information along with a screenshot of the webpage.
Stagehand examplets
const stagehand = new Stagehand({ env: "LOCAL", localBrowserLaunchOptions: { cdpUrl: endpointURLString(env.BROWSER) }, llmClient: new WorkersAIClient(env.AI), verbose: 1,});await stagehand.init();const page = stagehand.page;await page.goto("https://demo.playwright.dev/movies");// if search is a multi-step action, stagehand will return an array of actions it needs to act onconst actions = await page.observe('Search for "Furiosa"');for (const action of actions) await page.act(action);await page.act("Click the search result");// normal playwright functions work as expectedawait page.waitForSelector(".info-wrapper .cast");let movieInfo = await page.extract({ instruction: "Extract movie information", schema: z.object({ title: z.string(), year: z.number(), rating: z.number(), genres: z.array(z.string()), duration: z.number().describe("Duration in minutes"), }),});await stagehand.close();
AutoRAG is now AI Search! The new name marks a new and bigger mission: to make world-class search infrastructure available to every developer and business.
With AI Search you can now use models from different providers like OpenAI and Anthropic. By attaching your provider keys to the AI Gateway linked to your AI Search instance, you can use many more models for both embedding and inference.
In Provider Keys, choose your provider, click Add, and enter the key.
Connect a gateway to AI Search: When creating a new AI Search, select the AI Gateway with your provider keys. For an existing AI Search, go to Settings and switch to a gateway that has your keys under Resources.
Select models: Embedding models are only available to be changed when creating a new AI Search. Generation model can be selected when creating a new AI Search and can be changed at any time in Settings.
Once configured, your AI Search instance will be able to reference models available through your AI Gateway when making a /ai-search request:
export default { async fetch(request, env) { // Query your AI Search instance with a natural language question to an OpenAI model const result = await env.AI.autorag("my-ai-search").aiSearch({ query: "What's new for Cloudflare Birthday Week?", model: "openai/gpt-5" }); // Return only the generated answer as plain text return new Response(result.response, { headers: { "Content-Type": "text/plain" }, }); },};
In the coming weeks we will also roll out updates to align the APIs with the new name. The existing APIs will continue to be supported for the time being. Stay tuned to the AI Search Changelog and Discord ↗ for more updates!
AutoRAG now includes a Metrics tab that shows how your data is indexed and searched. Get a clear view of the health of your indexing pipeline, compare usage between ai-search and search, and see which files are retrieved most often.
You can find these metrics within each AutoRAG instance:
Indexing: Track how files are ingested and see status changes over time.
Search breakdown: Compare usage between ai-search and search endpoints.
Top file retrievals: Identify which files are most frequently retrieved in a given period.
We've shipped a new release for the Agents SDK ↗ bringing full compatibility with AI SDK v5 ↗ and introducing automatic message migration that handles all legacy formats transparently.
This release includes improved streaming and tool support, tool confirmation detection (for "human in the loop" systems), enhanced React hooks with automatic tool resolution, improved error handling for streaming responses, and seamless migration utilities that work behind the scenes.
This makes it ideal for building production AI chat interfaces with Cloudflare Workers AI models, agent workflows, human-in-the-loop systems, or any application requiring reliable message handling across SDK versions — all while maintaining backward compatibility.
Additionally, we've updated workers-ai-provider v2.0.0, the official provider for Cloudflare Workers AI models, to be compatible with AI SDK v5.
useAgentChat(options)
Creates a new chat interface with enhanced v5 capabilities.
Seamless integration with Cloudflare Workers AI models through the updated workers-ai-provider v2.0.0.
Model Setup with Workers AI
Use Cloudflare Workers AI models directly in your agent workflows:
import { createWorkersAI } from "workers-ai-provider";import { useAgentChat } from "agents/ai-react";// Create Workers AI model (v2.0.0 - same API, enhanced v5 internals)const model = createWorkersAI({ binding: env.AI,})("@cf/meta/llama-3.2-3b-instruct");
Enhanced File and Image Support
Workers AI models now support v5 file handling with automatic conversion:
// Send images and files to Workers AI modelssendMessage({ role: "user", parts: [ { type: "text", text: "Analyze this image:" }, { type: "file", data: imageBuffer, mediaType: "image/jpeg", }, ],});// Workers AI provider automatically converts to proper format
Streaming with Workers AI
Enhanced streaming support with automatic warning detection:
// Streaming with Workers AI modelsconst result = await streamText({ model: createWorkersAI({ binding: env.AI })("@cf/meta/llama-3.2-3b-instruct"), messages, onChunk: (chunk) => { // Enhanced streaming with warning handling console.log(chunk); },});
Import Updates
Update your imports to use the new v5 types:
// Before (AI SDK v4)import type { Message } from "ai";import { useChat } from "ai/react";// After (AI SDK v5)import type { UIMessage } from "ai";// or alias for compatibilityimport type { UIMessage as Message } from "ai";import { useChat } from "@ai-sdk/react";
We're excited to be a launch partner alongside Google ↗ to bring their newest embedding model, EmbeddingGemma, to Workers AI that delivers best-in-class performance for its size, enabling RAG and semantic search use cases.
@cf/google/embeddinggemma-300m is a 300M parameter embedding model from Google, built from Gemma 3 and the same research used to create Gemini models. This multilingual model supports 100+ languages, making it ideal for RAG systems, semantic search, content classification, and clustering tasks.
Using EmbeddingGemma in AI Search:
Now you can leverage EmbeddingGemma directly through AI Search for your RAG pipelines. EmbeddingGemma's multilingual capabilities make it perfect for global applications that need to understand and retrieve content across different languages with exceptional accuracy.
To use EmbeddingGemma for your AI Search projects:
We improved AI crawler management with detailed analytics and introduced custom HTTP 402 responses for blocked crawlers. AI Audit has been renamed to AI Crawl Control and is now generally available.
Enhanced Crawlers tab:
View total allowed and blocked requests for each AI crawler
Trend charts show crawler activity over your selected time range per crawler
Custom block responses (paid plans):
You can now return HTTP 402 "Payment Required" responses when blocking AI crawlers, enabling direct communication with crawler operators about licensing terms.
For users on paid plans, when blocking AI crawlers you can configure:
Response code: Choose between 403 Forbidden or 402 Payment Required
Response body: Add a custom message with your licensing contact information
Example 402 response:
HTTP 402 Payment RequiredDate: Mon, 24 Aug 2025 12:56:49 GMTContent-type: application/jsonServer: cloudflareCf-Ray: 967e8da599d0c3fa-EWRCf-Team: 2902f6db750000c3fa1e2ef400000001{ "message": "Please contact the site owner for access."}
New state-of-the-art models have landed on Workers AI! This time, we're introducing new partner models trained by our friends at Deepgram ↗ and Leonardo ↗, hosted on Workers AI infrastructure.
As well, we're introuding a new turn detection model that enables you to detect when someone is done speaking — useful for building voice agents!
Read the blog ↗ for more details and check out some of the new models on our platform:
@cf/deepgram/aura-1 is a text-to-speech model that allows you to input text and have it come to life in a customizable voice
@cf/deepgram/nova-3 is speech-to-text model that transcribes multilingual audio at a blazingly fast speed
@cf/leonardo/lucid-origin is a text-to-image model that generates images with sharp graphic design, stunning full-HD renders, or highly specific creative direction
@cf/leonardo/phoenix-1.0 is a text-to-image model with exceptional prompt adherence and coherent text
You can filter out new partner models with the Partner capability on our Models page.
As well, we're introducing WebSocket support for some of our audio models, which you can filter though the Realtime capability on our Models page. WebSockets allows you to create a bi-directional connection to our inference server with low latency — perfect for those that are building voice agents.
An example python snippet on how to use WebSockets with our new Aura model:
import jsonimport osimport asyncioimport websocketsuri = f"wss://api.cloudflare.com/client/v4/accounts/{ACCOUNT_ID}/ai/run/@cf/deepgram/aura-1"input = [ "Line one, out of three lines that will be provided to the aura model.", "Line two, out of three lines that will be provided to the aura model.", "Line three, out of three lines that will be provided to the aura model. This is a last line.",]async def text_to_speech(): async with websockets.connect(uri, additional_headers={"Authorization": os.getenv("CF_TOKEN")}) as websocket: print("connection established") for line in input: print(f"sending `{line}`") await websocket.send(json.dumps({"type": "Speak", "text": line})) print("line was sent, flushing") await websocket.send(json.dumps({"type": "Flush"})) print("flushed, recving") resp = await websocket.recv() print(f"response received {resp}")if __name__ == "__main__": asyncio.run(text_to_speech())
You can now list all vector identifiers in a Vectorize index using the new list-vectors operation. This enables bulk operations, auditing, and data migration workflows through paginated requests that maintain snapshot consistency.
The operation is available via Wrangler CLI and REST API. Refer to the list-vectors best practices guide for detailed usage guidance.
Cloudflare Secrets Store is now integrated with AI Gateway, allowing you to store, manage, and deploy your AI provider keys in a secure and seamless configuration through Bring Your Own Key ↗. Instead of passing your AI provider keys directly in every request header, you can centrally manage each key with Secrets Store and deploy in your gateway configuration using only a reference, rather than passing the value in plain text.
You can now create a secret directly from your AI Gateway in the dashboard ↗ by navigating into your gateway -> Provider Keys -> Add.
The latest releases of @cloudflare/agents ↗ brings major improvements to MCP transport protocols support and agents connectivity. Key updates include:
MCP elicitation support
MCP servers can now request user input during tool execution, enabling interactive workflows like confirmations, forms, and multi-step processes. This feature uses durable storage to preserve elicitation state even during agent hibernation, ensuring seamless user interactions across agent lifecycle events.
// Request user confirmation via elicitationconst confirmation = await this.elicitInput({ message: `Are you sure you want to increment the counter by ${amount}?`, requestedSchema: { type: "object", properties: { confirmed: { type: "boolean", title: "Confirm increment", description: "Check to confirm the increment", }, }, required: ["confirmed"], },});
Check out our demo ↗ to see elicitation in action.
HTTP streamable transport for MCP
MCP now supports HTTP streamable transport which is recommended over SSE. This transport type offers:
Better performance: More efficient data streaming and reduced overhead
Improved reliability: Enhanced connection stability and error recover- Automatic fallback: If streamable transport is not available, it gracefully falls back to SSE
The SDK automatically selects the best available transport method, gracefully falling back from streamable-http to SSE when needed.
Enhanced MCP connectivity
Significant improvements to MCP server connections and transport reliability:
Auto transport selection: Automatically determines the best transport method, falling back from streamable-http to SSE as needed
Improved error handling: Better connection state management and error reporting for MCP servers
Reliable prop updates: Centralized agent property updates ensure consistency across different contexts
Lightweight .queue for fast task deferral
You can use .queue() to enqueue background work — ideal for tasks like processing user messages, sending notifications etc.
class MyAgent extends Agent { doSomethingExpensive(payload) { // a long running process that you want to run in the background } queueSomething() { await this.queue("doSomethingExpensive", somePayload); // this will NOT block further execution, and runs in the background await this.queue("doSomethingExpensive", someOtherPayload); // the callback will NOT run until the previous callback is complete // ... call as many times as you want }}
Want to try it yourself? Just define a method like processMessage in your agent, and you’re ready to scale.
New email adapter
Want to build an AI agent that can receive and respond to emails automatically? With the new email adapter and onEmail lifecycle method, now you can.
export class EmailAgent extends Agent { async onEmail(email: AgentEmail) { const raw = await email.getRaw(); const parsed = await PostalMime.parse(raw); // create a response based on the email contents // and then send a reply await this.replyToEmail(email, { fromName: "Email Agent", body: `Thanks for your email! You've sent us "${parsed.subject}". We'll process it shortly.`, }); }}
Custom methods are now automatically wrapped with the agent's context, so calling getCurrentAgent() should work regardless of where in an agent's lifecycle it's called. Previously this would not work on RPC calls, but now just works out of the box.
export class MyAgent extends Agent { async suggestReply(message) { // getCurrentAgent() now correctly works, even when called inside an RPC method const { agent } = getCurrentAgent()!; return generateText({ prompt: `Suggest a reply to: "${message}" from "${agent.name}"`, tools: [replyWithEmoji], }); }}
We’ve shipped a major release for the @cloudflare/sandbox ↗ SDK, turning it into a full-featured, container-based execution platform that runs securely on Cloudflare Workers.
This update adds live streaming of output, persistent Python and JavaScript code interpreters with rich output support (charts, tables, HTML, JSON), file system access, Git operations, full background process control, and the ability to expose running services via public URLs.
This makes it ideal for building AI agents, CI runners, cloud REPLs, data analysis pipelines, or full developer tools — all without managing infrastructure.
Code interpreter (Python, JS, TS)
Create persistent code contexts with support for rich visual + structured outputs.
createCodeContext(options)
Creates a new code execution context with persistent state.
Sandboxes are still experimental. We're using them to explore how isolated, container-like workloads might scale on Cloudflare — and to help define the developer experience around them.
We're thrilled to be a Day 0 partner with OpenAI ↗ to bring their latest open models ↗ to Workers AI, including support for Responses API, Code Interpreter, and Web Search (coming soon).
Get started with the new models at @cf/openai/gpt-oss-120b and @cf/openai/gpt-oss-20b.
Check out the blog ↗ for more details about the new models, and the gpt-oss-120b and gpt-oss-20b model pages for more information about pricing and context windows.
Responses API
If you call the model through:
Workers Binding, it will accept/return Responses API – env.AI.run(“@cf/openai/gpt-oss-120b”)
REST API on /run endpoint, it will accept/return Responses API – https://api.cloudflare.com/client/v4/accounts/<account_id>/ai/run/@cf/openai/gpt-oss-120b
REST API on new /responses endpoint, it will accept/return Responses API – https://api.cloudflare.com/client/v4/accounts/<account_id>/ai/v1/responses
REST API for OpenAI Compatible endpoint, it will return Chat Completions (coming soon) – https://api.cloudflare.com/client/v4/accounts/<account_id>/ai/v1/chat/completions
The model is natively trained to support stateful code execution, and we've implemented support for this feature using our Sandbox SDK ↗ and Containers ↗. Cloudflare's Developer Platform is uniquely positioned to support this feature, so we're very excited to bring our products together to support this new use case.
Web Search (coming soon)
We are working to implement Web Search for the model, where users can bring their own Exa API Key so the model can browse the Internet.
We’ve launched pricing for Browser Rendering, including a free tier and a pay-as-you-go model that scales with your needs. Starting August 20, 2025, Cloudflare will begin billing for Browser Rendering.
There are two ways to use Browser Rendering. Depending on the method you use, here’s how billing will work:
REST API: Charged for Duration only ($/browser hour)
Browser Sessions: Charged for both Duration and Concurrency ($/browser hour and # of concurrent browsers)
Included usage and pricing by plan
Plan
Included duration
Included concurrency
Price (beyond included)
Workers Free
10 minutes per day
3 concurrent browsers
N/A
Workers Paid
10 hours per month
10 concurrent browsers (averaged monthly)
1. REST API: $0.09 per additional browser hour 2. Workers Bindings: $0.09 per additional browser hour $2.00 per additional concurrent browser
What you need to know:
Workers Free Plan: 10 minutes of browser usage per day with 3 concurrent browsers at no charge.
Workers Paid Plan: 10 hours of browser usage per month with 10 concurrent browsers (averaged monthly) at no charge. Additional usage is charged as shown above.
If you've been using Browser Rendering and do not wish to incur charges, ensure your usage stays within your plan's included usage. To estimate costs, take a look at these example pricing scenarios.
You can now run your Browser Rendering locally using npx wrangler dev, which spins up a browser directly on your machine before deploying to Cloudflare's global network. By running tests locally, you can quickly develop, debug, and test changes without needing to deploy or worry about usage costs.
You can now expect 3-5× faster indexing in AutoRAG, and with it, a brand new Jobs view to help you monitor indexing progress.
With each AutoRAG, indexing jobs are automatically triggered to sync your data source (i.e. R2 bucket) with your Vectorize index, ensuring new or updated files are reflected in your query results. You can also trigger jobs manually via the Sync API or by clicking “Sync index” in the dashboard.
With the new jobs observability, you can now:
View the status, job ID, source, start time, duration and last sync time for each indexing job
Inspect real-time logs of job events (e.g. Starting indexing data source...)
See a history of past indexing jobs under the Jobs tab of your AutoRAG
This makes it easier to understand what’s happening behind the scenes.
Coming soon: We’re adding APIs to programmatically check indexing status, making it even easier to integrate AutoRAG into your workflows.