Reboot — Power cycle the appliance. Optionally, purge persistent state. Re-applies configuration starting from scratch.
Shutdown — Power off the appliance. Optionally, purge persistent state. The machine will be offline until manually powered on again.
In the dashboard, go to Networking > Connectors > Appliances, select an appliance, then Edit > Operations to send an operation. Via API, POST to the /accounts/{account_id}/magic/connectors/{connector_id}/interrupts endpoint.
You can now preview the content of sent emails directly from the Email Service Activity log. Expand a sent email and open the new Preview section to inspect the message as it was sent, across tabs for the rendered HTML body, the Text body, the Headers, the Attachments, and the full RawRFC 5322 ↗ source.
Previously, the Activity log surfaced delivery and authentication metadata but not the message content, making rendering and content issues harder to debug. Message preview closes that gap.
To make messages previewable, turn on Email preview in your sending domain's settings. Previews cover messages sent while the setting is turned on and are retained for about seven days. Sending domains onboarded on or after 2026-07-02 have Email preview turned on automatically.
Cloudflare Gateway now supports advanced header control on Allow policies. Administrators can add, overwrite, or delete headers on matching requests using static values or dynamic variables.
Header operations
Gateway HTTP policies using the Allow action support three operations in rule_settings:
Operation
API field
Behavior
Add
add_headers
Appends a value to the header. Existing values are preserved.
Overwrite
set_headers
Replaces the header value. Creates the header if it does not exist.
Delete
delete_headers
Removes the header from the request.
Gateway applies operations in order: delete, then overwrite, then add.
Dynamic variables
Header values can include dynamic variables using the @{...} syntax. Gateway resolves variables at request time from identity, device, and network context.
Variable
Description
@{identity.email}
User email from the identity provider
@{identity.name}
User display name from the identity provider
@{identity.id}
Cloudflare identity UUID
@{identity.groups}
Identity provider group memberships
@{identity.SAML}
SAML attributes (if configured)
@{identity.OIDC}
OIDC claims (if configured)
@{source.ip}
Source IP of the connection
@{destination.ip}
Destination IP of the request
@{device.id}
Cloudflare One Client device UUID
@{device.posture}
Device posture check results (JSON string)
You can mix static text and dynamic variables in a single header value. For example, user-@{identity.email} resolves to user-jdoe@example.com.
Distributor, MSSP, and Agency partners on Cloudflare Organizations can now add and manage Organization Members directly from the Cloudflare dashboard, without help from Cloudflare.
Previously, adding a member to a Distributor, MSSP, or Agency Organization was a manual, Cloudflare-assisted process that required a request to Cloudflare and enrollment in a closed beta, and the dashboard Add member flow was blocked for these Organizations.
Now, Organization admins can add members themselves from Organization > Members > Add member, with no beta enrollment required.
New members receive access to the Organization's accounts through the same implicit-access model already used for enterprise Organizations. The Accounts list and the account switcher classify Distributor, MSSP, and Agency Organizations consistently with enterprise Organizations, so their accounts are labeled and grouped correctly in the dashboard.
Agency partners also gain access to the Organizations dashboard, while retaining access to their existing Tenant management dashboard.
Distributor, MSSP, and Agency Organizations are currently in beta.
This emergency release adds a new managed rule to block active exploitation of a critical remote code execution (RCE) and SQL injection (SQLi) vulnerability found in popular web frameworks.
Key Findings
Generic Frameworks - Unauthenticated RCE: Attackers can execute arbitrary system commands with web server privileges by sending malicious input containing invalid path sequences during request processing.
Generic Frameworks - SQLi: Attackers can execute unauthorized database queries due to a failure to sanitize input values within request parameters.
Users in browser-based RDP sessions can now print multiple PDF files as a single print job. Copy the files to your clipboard on the remote machine, then select Print all PDFs in the clipboard panel. The files are combined into one PDF and sent to your local printer.
Bulk print is available in Chromium-based browsers and Firefox. For more information, refer to Print PDFs for browser-based RDP.
After a flag exists, change its default variation or use enable and disable commands as kill switches. Existing targeting rules continue to apply unless you change or clear them explicitly:
These commands can also be used from CI/CD pipelines, scripts, and AI agents to inspect Flagship state, update flag behavior, or roll back changes through Wrangler.
Bot management fields and ASN support in Cache Rules
Cache Rules now supports bot management fields and the ip.src.asnum field in expression filters. You can now build cache policies that differentiate between automated and human traffic, or segment caching behavior by autonomous system number (ASN).
This allows you to apply different caching strategies for verified bots, high-risk traffic, or specific network operators without affecting legitimate user requests. For example, you can set shorter cache TTLs for suspected bot traffic or bypass cache entirely for requests from specific ASNs.
New fields
The following fields are now available in Cache Rules expressions:
Field
Type
Description
cf.bot_management.score
Number
Bot score from 1 to 99, where a lower value indicates a higher likelihood that the request originates from a bot.
cf.bot_management.ja3_hash
String
JA3 fingerprint of the request, which helps identify the client making the connection.
cf.bot_management.ja4
String
JA4 fingerprint of the request, which provides a more detailed client identification than JA3.
cf.bot_management.verified_bot
Boolean
Whether the request originates from a verified bot, such as a search engine crawler.
cf.bot_management.static_resource
Boolean
Whether the request is for a static resource and therefore exempt from bot detection.
cf.bot_management.js_detection.passed
Boolean
Whether the browser passed JavaScript detection when the feature is enabled.
cf.bot_management.attack_score
Number
Classifies the request by attack score, from 1 (likely automated) to 99 (likely human).
cf.bot_management.api_score
Number
Classifies the request by API score, from 1 (likely automated) to 99 (likely human).
cf.bot_management.bot_tags["<TAG>"]
Boolean
Whether the bot traffic matches the specified tag, such as google or bing.
cf.bot_management.corporate_proxy
Boolean
Whether the request originates from a known corporate proxy.
ip.src.asnum
Number
The autonomous system number (ASN) of the incoming request's IP address.
Example
Cache Rules expressions support combining these fields with other criteria. The following example sets a shorter cache TTL for API requests that originate from a high-risk bot or an unexpected ASN:
(http.request.uri.path contains "/api/" and cf.bot_management.score lt 30)or(http.request.uri.path contains "/api/" and not ip.src.asnum in {12345 67890})
Internal DNS is now generally available. Internal DNS provides authoritative and recursive DNS for private networks on the same global network and control plane you already use for public DNS, Zero Trust, and application services.
Why it matters
Consolidate DNS operations. Public and private DNS run on one platform, with one API, one audit trail, and one place to set policy.
Simplify split-horizon DNS. Internal and external resolution are defined as separate views over shared zones, managed from a single control plane — so there is no drift to chase down.
Extend Zero Trust to DNS. Resolver policies decide which users and devices resolve against which view, enforced by the same Gateway that already governs the rest of your traffic.
Setting up Internal DNS takes three steps: create a zone, create a view, and define a resolver policy.
You can now subscribe to Email Sending events through Queues event subscriptions and receive outbound transactional email lifecycle events on a queue. Each subscription is scoped to one sending domain — either the zone apex, such as example.com, or a verified sending subdomain, such as send.example.com.
Six event types are published: message.delivered, message.deferred, message.bounced, message.failed, message.rejected, and message.complained. Use them to track deliverability, react to bounces and complaints, and drive suppression or retry logic. Email Routing events are not published on this source.
Each event includes the message details, delivery status, and SMTP response:
The legacy Workers KV API routes under /accounts/{account_id}/workers/namespaces/* are deprecated as of July 15, 2026, and will stop working on October 15, 2026. Migrate to the documented Workers KV API routes under /accounts/{account_id}/storage/kv/namespaces/* before that date.
The legacy and replacement routes are interchangeable. They accept the same request parameters and return the same response payloads. To migrate, update the URL path from /workers/namespaces/ to /storage/kv/namespaces/.
What you need to do
Update any integration that calls a route under /accounts/{account_id}/workers/namespaces/ to use the equivalent route under /accounts/{account_id}/storage/kv/namespaces/. The migration is a direct URL path substitution — request parameters and response payloads are identical:
GET and POST /accounts/{account_id}/workers/namespaces → GET and POST /accounts/{account_id}/storage/kv/namespaces
GET, PUT, and DELETE /accounts/{account_id}/workers/namespaces/{namespace_id} → GET, PUT, and DELETE /accounts/{account_id}/storage/kv/namespaces/{namespace_id}
GET /accounts/{account_id}/workers/namespaces/{namespace_id}/keys → GET /accounts/{account_id}/storage/kv/namespaces/{namespace_id}/keys
GET /accounts/{account_id}/workers/namespaces/{namespace_id}/metadata/{key_name} → GET /accounts/{account_id}/storage/kv/namespaces/{namespace_id}/metadata/{key_name}
GET, PUT, and DELETE /accounts/{account_id}/workers/namespaces/{namespace_id}/values/{key_name} → GET, PUT, and DELETE /accounts/{account_id}/storage/kv/namespaces/{namespace_id}/values/{key_name}
For more information about the deprecation timeline, refer to API deprecations.
This release introduces new rules targeting critical infrastructure vulnerabilities. These include an unauthenticated memory disclosure flaw in Citrix NetScaler ADC and Gateway (CVE-2026-8451) and a high-severity pre-authentication remote code execution (RCE) vulnerability in Progress Kemp LoadMaster (CVE-2026-8037).
Key Findings
CVE-2026-8451: An insufficient input validation vulnerability affects Citrix NetScaler ADC and NetScaler Gateway appliances configured as a SAML Identity Provider (IdP). Remote, unauthenticated attackers can exploit this flaw by sending malformed requests to trigger a memory overread, allowing them to leak chunks of sensitive data from adjacent appliance memory.
CVE-2026-8037: A critical OS command injection vulnerability in Progress Kemp LoadMaster load balancers allows unauthenticated remote attackers to achieve remote code execution (RCE).
Cloudflare Web Analytics (Real User Monitoring) has rolled out performance optimizations to significantly improve the stability and loading speed of account-wide dashboards.
For larger accounts (with >100 Web Analytics sites), loading the aggregate account-wide view would often fail, running into timeouts or unexpected interface errors due to the massive scale of parallel query processing. This update optimizes how high-volume multi-site data is queried to reduce errors and provide a snappier dashboard experience.
Accounts with up to 1,000 sites will now be able to load this account-wide aggregate view without experiencing misleading errors.
If you have an account with over 1,000 sites, we cannot currently aggregate over this volume due to processing constraints but you will now be presented with a clear error and instruction to filter to the relevant site(s) you wish to see the data for.
Platforms can now create temporary preview accounts through the Cloudflare REST API. This lets your platform deploy a live Worker before the user signs in to Cloudflare.
With the Temporary Accounts API, coding agents, AI app builders, and other platforms can build a similar flow for generated Workers and supported resources.
Your platform can keep users in its onboarding flow while they generate, deploy, and test an application. Users do not need an existing Cloudflare account, and your platform does not need write access to one.
The API returns a claim URL that lets the user make the temporary account and its resources permanent.
Cloudflare Drop ↗ demonstrates this preview-and-claim pattern for static sites. Someone can upload a site, test and share it for one hour, then sign in or create an account only when they want to keep it.
This API expands the flow first introduced with wrangler deploy --temporary. Your backend now controls the provisioning and deployment experience directly:
Show Cloudflare's Terms of Service and Privacy Policy in your product, and require the user to accept them.
Request and solve a proof-of-work challenge.
Create a temporary preview account.
Deploy with the returned temporary account ID and API token.
Show the deployed Worker URL and claim URL to the user.
Agents connected to Model Context Protocol (MCP) servers with addMcpServer can now handle elicitation ↗ requests.
Elicitation lets an MCP server request user input while it handles a tool call. Form mode collects structured, non-sensitive data. URL mode asks for consent before opening an out-of-band flow, such as third-party authorization or payment.
sequenceDiagram
    participant User
    participant Agent as Agent (MCP client)
    participant Server as MCP server
    participant Browser

    Server->>Agent: elicitation/create
    Agent->>User: Show server, reason, and input or URL
    User->>Agent: Submit, open, decline, or cancel
    Agent->>Browser: Open URL after consent (URL mode)
    Agent->>Server: accept, decline, or cancel
    Server-->>Agent: Optional URL completion notification
Register a handler for each mode your Agent supports in onStart():
import { Agent } from "agents";export class MyAgent extends Agent { onStart() { this.mcp.configureElicitationHandlers({ form: (request, serverId) => this.forwardToUser(request, serverId), url: (request, serverId) => this.forwardToUser(request, serverId), }); } forwardToUser(request, serverId) { // Show the request in your UI and resolve after the user responds. throw new Error( `Implement elicitation for ${serverId}: ${request.params.message}`, ); }}
import { Agent } from "agents";import type { ElicitRequest, ElicitResult } from "agents/mcp";export class MyAgent extends Agent<Env> { onStart() { this.mcp.configureElicitationHandlers({ form: (request, serverId) => this.forwardToUser(request, serverId), url: (request, serverId) => this.forwardToUser(request, serverId), }); } private forwardToUser( request: ElicitRequest, serverId: string, ): Promise<ElicitResult> { // Show the request in your UI and resolve after the user responds. throw new Error( `Implement elicitation for ${serverId}: ${request.params.message}`, ); }}
Connections advertise only the modes with configured handlers. An Agent without handlers advertises no elicitation capability, which lets the server use its fallback. The SDK stores the advertised modes with each MCP server registration so they survive Durable Object hibernation. Callback functions remain in memory and reattach when onStart() runs.
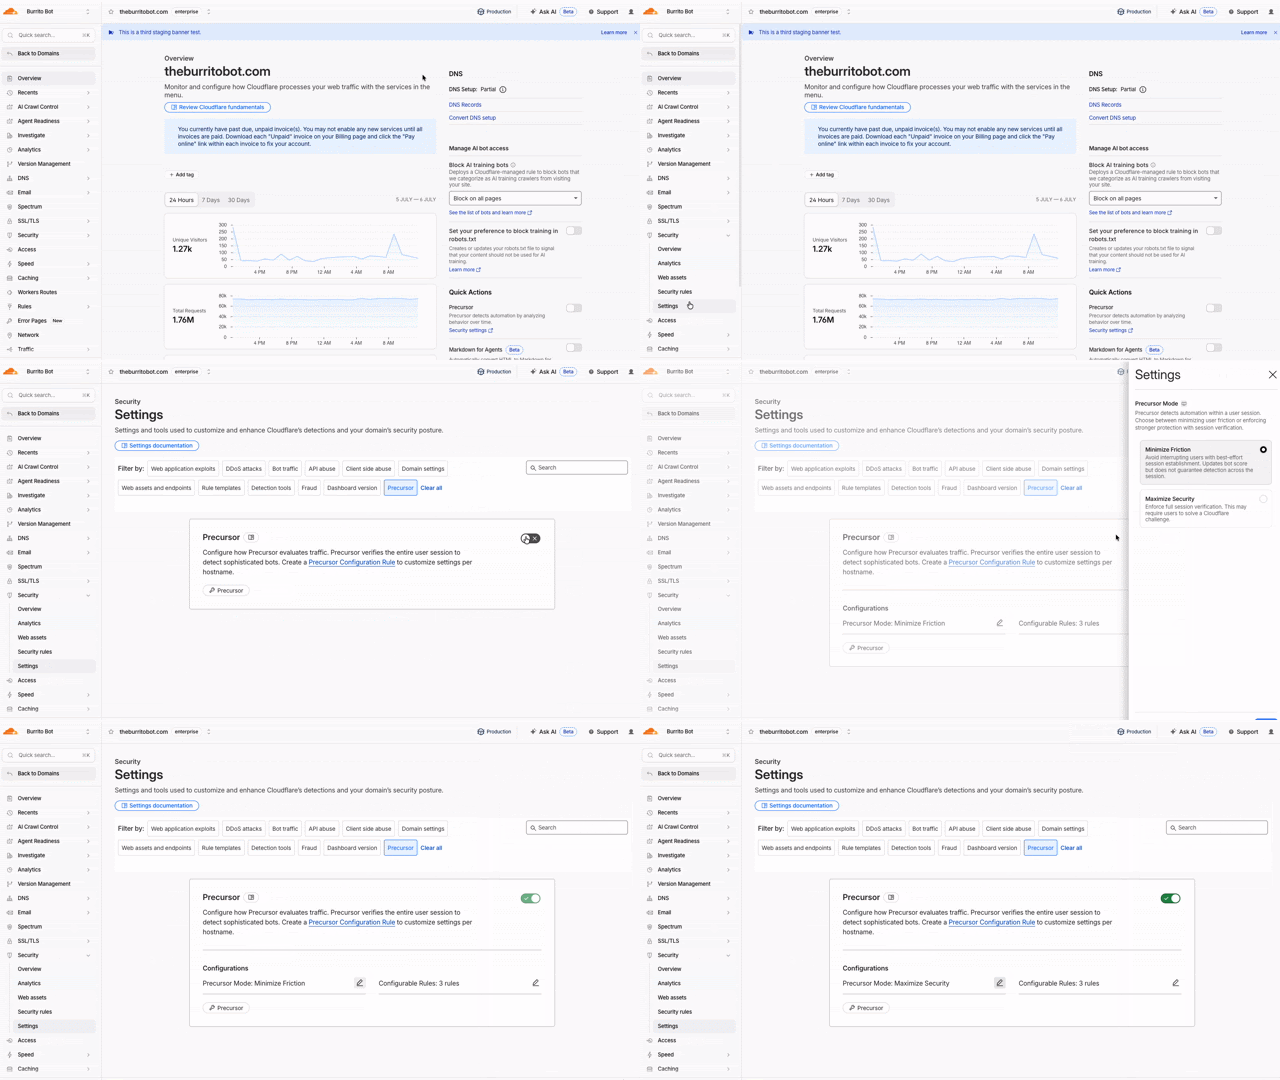
Precursor is rolling out to all customers starting today. Precursor is client-side JavaScript that enables session-based bot detection.
You can read the announcement blog ↗ for background on why we built Precursor and how session-level behavioral detection works.
With Precursor enabled, Cloudflare can:
Continuously evaluate behavioral signals across a session
Re-validate challenge clearance as behavior changes
Update bot scores with session context
Provide client-side visibility where none previously existed
It integrates with existing protections, including Security Rules, and can be enabled directly from the Cloudflare dashboard with configurable modes to balance security and user experience.
Markdown for Agents now preserves security- and cache-relevant response headers from your origin when converting HTML to Markdown:
Markdown for Agents preserves security headers such as Strict-Transport-Security (HSTS), Content-Security-Policy (CSP), X-Frame-Options, Set-Cookie, and CORS headers (for example, Access-Control-Allow-Origin) on the converted response.
Caching headers (Cache-Control, Expires, Age) continue to pass through.
Your origin's Content Signals ↗ policy is now authoritative. If your origin sets a content-signal header, Markdown for Agents preserves it. When the origin does not send one, Cloudflare adds the default Content-Signal: ai-train=yes, search=yes, ai-input=yes.
This release also fixes relative link resolution for directory-style base URLs (those ending in a trailing slash). Previously, relative links such as ../page/ could resolve one path segment too high and return a 404. Links are now resolved correctly per RFC 3986 ↗.
R2 Data Catalog now accepts read-only API tokens, so query engines and clients that only read data no longer need a read-write token. Previously, every catalog operation required an Admin Read & Write token, which granted read-only clients more access than they needed.
You can now authenticate your Iceberg engine based on your workload:
Read-only operations (such as listing namespaces, loading tables, and querying data) work with an Admin Read only token (R2 Data Catalog read and R2 storage read).
Write operations (such as creating or dropping tables and committing transactions) continue to require an Admin Read & Write token.
This lets you follow the principle of least privilege — for example, using a read-write token for the pipeline that writes to your tables and read-only tokens for engines like R2 SQL, DuckDB, or PyIceberg that query them.
Note that credentials vended by the catalog inherit the R2 storage permissions of the token used to authenticate. To ensure read-only access to your underlying data, scope the R2 storage permission to read-only as well.
Manifest files track the data files that make up an Iceberg table. As a table accumulates many small or fragmented manifests, query engines must read more metadata during query planning, which slows down queries even before any data is scanned.
When compaction runs, R2 Data Catalog now rewrites and clusters manifest files by partition as a best-effort pre-step. This consolidates fragmented manifests, reduces the number of manifests a query engine must open, and lowers metadata I/O overhead. Tables that are already well-clustered are skipped, so the operation only runs when it provides a benefit.
This happens automatically for tables with compaction enabled — no configuration changes are required.
Data Loss Prevention (DLP) source code detection now focuses on identifying whole source code file uploads and downloads. Previously, source code detection performed partial scans resulting in a higher rate of false positives. Since only whole source code files are evaluated, code embedded in other content — such as chat messages, documentation, or code samples — is no longer flagged as source code, removing a common source of false positives.
Source code detection requires a minimum of 500 characters to evaluate a file. Files below this threshold are not flagged to reduce noise. This threshold filters out small fragments that lack enough context for reliable classification.
Enable and set confidence levels to tune match sensitivity. A higher confidence level reduces false positives by requiring stronger signals that the content is truly source code. A lower confidence level catches more files at the cost of additional noise.
Source code detection applies to standalone source code files in Gateway HTTP policies. It does not detect source code embedded within other file types or payloads, such as .docx files or chat messages.
With Workflows, you can configure built-in retry behavior for each step. Previously, you could configure step retries with fixed delay durations, such as seconds, minutes, or hours, and backoff strategies such as constant, linear, or exponential.
Step retries now support dynamic delay functions. Instead of choosing only a base delay and backoff strategy, pass a function to retries.delay and calculate the next delay from the failed attempt and thrown error.
This is useful when retries should depend on the failure. Your Workflow may need to wait longer after a rate-limit error, but retry sooner after a short network failure. The delay function can also accommodate provider guidance if, for example, a downstream API returns a Retry-After value in its error messaging.
Dynamic delay functions can return a duration string, a number, or a promise that resolves to a duration. Use them to add adaptive retry behavior without writing separate queue or scheduling logic. For more information, refer to Sleeping and retrying.
Digital Experience Monitoring (DEX) provides visibility into device, network, and application performance across your Cloudflare SASE deployment.
The Device Monitoring page now analyzes hardware and network data between a Cloudflare One Client device and Cloudflare's edge, so you can diagnose connectivity and performance issues. Previously, this data was only available in raw DEX Device State Event logs, which required you to build your own analytics to interpret it.
A summary at the top of the page shows the health of each category at a glance, using Good, Fair, and Poor labels:
Connection — connection status, Cloudflare One Client mode, and tunnel type over time
Wi-Fi signal strength — signal measured in dBm over time, with thresholds that flag a weak signal
Traffic performance — upstream and downstream performance, including network throughput on the active interface
Device health — hardware metrics such as CPU, memory, and disk
You can filter by category and adjust the time range to correlate a device's metrics with a user's reported issue.
These analytics are available to all Cloudflare One customers at no additional cost.
The DNS Firewall page in the Cloudflare dashboard has been refreshed, bringing several settings that were previously API-only into the UI and modernizing how you view and manage your DNS Firewall clusters.
What is new
More settings in the dashboard: cluster options that were previously only configurable through the API — such as attack mitigation, rate limiting, negative TTL, and resolver subnet — are now available directly in the dashboard.
Better table experience: the DNS Firewall cluster table has been revised to surface cluster details at a glance, with resizable columns and the option to show or hide columns to tailor the view to your workflow.
New create and edit UX: adding and editing clusters now uses a modernized form that groups related settings together, making configuration faster and clearer.
Availability
Available to all DNS Firewall customers as part of their existing subscription.
Where to find it
In the Cloudflare dashboard, go to the DNS Firewall page.
If your account does not already have a key-value (KV) backed Durable Object namespace, you can no longer create new ones. New Durable Object namespaces must use the SQLite storage backend, which has been recommended for all new Durable Objects since it became generally available ↗ in 2024.
Create a new class with a new_sqlite_classes migration:
SQLite-backed Durable Objects have feature parity with the key-value backend — including the key-value storage API — and additionally support relational SQL queries and point-in-time recovery to restore an object's storage to any point in the past 30 days.
If you attempt to create a new key-value backed namespace (a new_classes migration) on an affected account, the deployment fails with the following error:
Creating new key-value backed Durable Object namespaces is no longer supported on this account. Please create a namespace using a `new_sqlite_classes` migration instead.
This change only affects accounts that are not already using the key-value storage backend. Accounts with at least one existing key-value backed namespace can still create new ones for now, and the Workers Free plan has only ever supported SQLite-backed Durable Objects. It is part of a broader move toward SQLite as the single storage backend for Durable Objects, ahead of a future migration path for existing key-value backed objects.